Dear Crafters,
Today I am here to show you how I made this ADORABLE! Bear Mini Album using just 1 sheet of 12" x 12" patterned paper!
This album also uses a TON! of washi tape (good stash buster) and also has a cascading ribbon feature down the side for heaps of interactive fun!
Now, there are so many ways out there of making mini albums from one sheet of paper.
I got my inspiration from a docrafts video, but I altered it slightly to make it my own.
Lets get started!
First Ill show you how I put together this bear!
I used this adorable bear die from the August Kit
He was very easy to color in and assemble.
You can watch me do that in the first part of the video HERE
I enjoyed making LOTS of bears ....
... in all colors!
You can also have fun with the bear sign included in the set!
It looks like the bears had their own demonstration this week :)
One Page Mini Album
To make the album pages
Pull out a 12" x 12" Sheet of patterned card stock
This is a G45 one I've had in my stash for a long time.
It is double sided so here is what the back looked like
Cut the paper @ 4"
So now you have 2.
Hold on to the smaller piece- you'll need that for the cover of the your album.
With the 8" x 12" piece, fold in half one way...
.. then fold in half the other way.
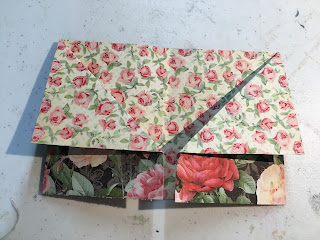
You should have something that looks like this..
Flatten this down and draw a line along the crease line in the middle between 3" and 9"
Slit this with your cutting tool or scalper knife.
Apply double sided tape as indicated on the opposite side.
You will know need to manipulate the paper so that you can bring it into this formation.
Watch me do it in the video HERE
Line up your edges and burnish really well to mould your album into form.
Then!!
Go washi crazy!
I added a different washi to each outer page of the album.
Next, I created a cascading ribbon feature using the ribbon set from the August Kit.
I cut about 1/2" of each and using my mini stapler, stapled a ribbon to each page.
LOOK HOW CUTE!!!
To make the cover
For the cover, use your 4" x 12" piece that you cut from Step 1.
Fold in half this way....

Fold in towards the middle crease mark like this..
.. then turn the 2 inner edges to meet the outside of the paper like this.
I flipped it over because I wanted the lighter pattern to be my cover.
Next, fold in that flap and add double sided tape along the bottom
Remove backing and burnish down.
Repeat on other side.
This is the cover of your mini album
Next we need to bind the album into the cover.
For this, I used an open stapler and a large eraser.
Watch how I do this is my video if you need more guidance.
I then added double sided tape along the spine...
...and some washi tape to hide the staple and make it more decorative.
Lastly, I used my 1" round punch along the top for a more decorative finish.
Cover decoration
This pattern paper, although I love it, is very busy so I used a piece of vellum and stamped some journaling lines for some interest in the background.
I then layered some embellishments (butterfly and ticket), added my bear and his sign (plus the grass with Nuvo crystal drops) and it was complete!
Here is my Bear One Page Mini Album.
So quick and easy, I made a few.
If you love bears, you'll love this die.
If you love making little booklets you'll love this quick and easy method.
Thank you so much for tuning in.
Here's the video (one more time eh!)
Happy crafting,
xxAmira


Comments
Post a Comment