Hi everyone,
I'm dreaming of a winter getaway!
And inviting you to a gatefold card challenge for July!
When we lived in Ontario, we used to getaway to the mountains to a ski lodge and spend the day or weekend if we were lucky, having fun in the snow.
When I saw this paper collection, I got so nostalgic that I decided to make a snow lodge themed super extended gatefold card to capture the memories.
And I hope you join me by making this fun card and then decorating it with any beautiful paper collection I know you have in your stash- or if you are feeling super inspired, check out the July Kit from Aunty Vera Scrap and Craft to make your very own exactly like this.

I found an amazing tutorial on YT by the lovely Collete Mitrega. You can check out her original video HERE.
I had to adapt the dimensions of her gatefold card to be able to use the 4"x 4" and 4" x 6" journaling cards from this collection.
Here is the tutorial for my Sub-zero Ski Lodge Gatefold Card


I started off using 3 pieces of 12" x 12" Kraft card stock from Francheville.
You will need to cut the following pieces:
- 2 pieces 6.5" x 12"
- 2 pieces 6.5" x 6"
- 1 pieces 6.5" x 4"


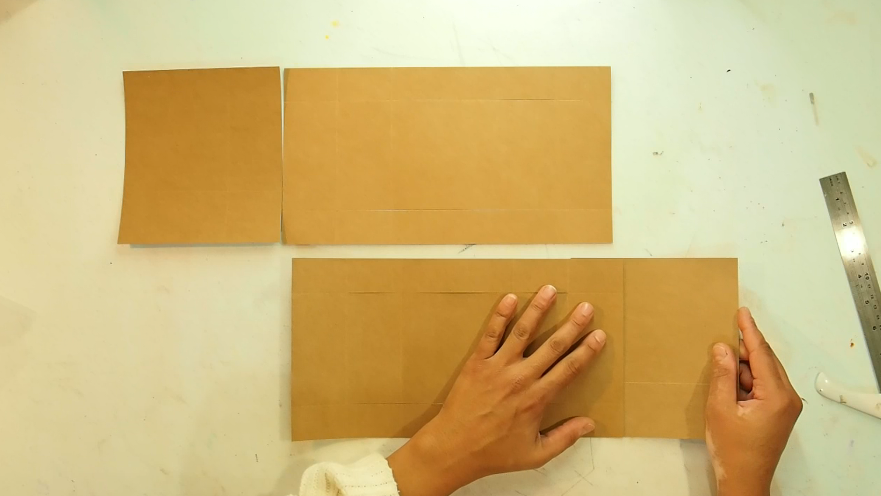
Now for the scoring,
- For the 6.5" x 6" pieces, have the 6" along the top of the score board and score in @2"

- For the 6.5" x 12" pieces, have the 12" along the top of the score board and score @2", 4", 8", 10"

- Now have the 6.5" along the top of the score board and score @ 1.25"

Rotate and score again 1.25" from the other side
- Now, place a cutting matt underneath your pieces and cut a slit along the 1.25" score mark from the 2" mark to the 10" mark.

Now rotate and make a slit again on the other side.
And can we just stop to ohhh and ahhhh and salivate over the new gorgeous GORJUSS cutting matt and cutting blade.
Super great quality product (and not just because I love the design).
The cutting matt is self healing (you cant see where you have cut on it) and the blade and it's handle are SO sturdy and ergonomic.
I'm throwing out my fishers cutting matt! This one is a keeper!

You should now have both those 6.5"x12" pieces each with 2 slits.

You will need to adhere the 6.5" x 6" piece to the left of one of the long pieces and the other to the right of the other.
Now it's time to fold.
I suggest you watch my tutorial @13.35 mins to see how it's done.
This is how it should look.

Repeat with other card but make a mirror folding copy.

Last of all you will need to adhere the final 6.5" x 4" kraft card stock to make the gatefold card one piece.
Your basic gatefold card is now ready and should look like this

Now the fun begins!
It's decorating time!!!
The decorating tutorial can be found in Part 2
I started off by choosing my 4" x 4" and 4" x 6" element cards and adhering them down.

Some of the panels are 2" x 4" and for those, I split the 4"x4" card in half and adhered them so that when they fold open, your can hardly see the join.


Next, I applied the plan pattern to either side of the ski hill.

Next it was time to fussy cut and attach some snow men to that ski hill.

Then, it was time to decorate the top and bottom 1.25" strip with this attractive red and white sweater patterned paper.

To that, I adhered signs and plaques from the collection to the top panel and snow men and snow gear along the bottom.

I repeated my decorating technique on the back.

For the front, I used the 4" x 6" ski lodge journaling card.

I cut apart the windows using my Gorjuss mat and blade.

And put some snowmen behind there so that they are peeking out.

Add a few signs and a few characters ...

And some sequins and bling snow flakes ...

Last of all, you need to make a belly band to hold this super card together,
Watch my tutorial to see how I made mine.

And this is my project!

I sure hope you feel inspired to make one.
It makes such a cute decoration piece and an interesting point of conversation.
Once again, here are the links to my card tutorial and decoration process video
Part 1 - Gatefold Card Tutorial HERE
Part 2 - Decoration process Video HERE
Check out the July Kit at Aunty Vera Scrap and Craft HERE
xx Amira
Comments
Post a Comment